


The contents of this website are strictly © Labyrinthos 2026, unless stated otherwise.
Please contact us for permission to reproduce any text or images.

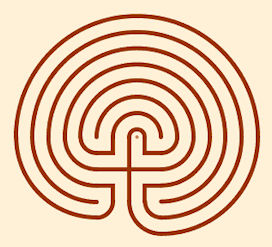 The knowledge of how to draw a “classical” labyrinth, and how to
transfer that skill to the construction of a full size labyrinth on the ground, has been passed from one generation to another for thousands of years.
Here’s the foolproof method for drawing the classical labyrinth and creating a labyrinth of your own...
There are many books and websites which illustrate the method of drawing a 7-
The Seed Pattern
 First, however, let us start by looking at an animation of the basic drawing process:
There are two key factors to using this method successfully:
(i) remembering the seed pattern (the cross, corners and dots)
(ii) practice, practice, practice!
This is a great way to create "freehand" designs outdoors -
scratch the design on a sandy beach with a stick;
use large pebbles to make the design more resilient;
use sticks to make the pattern in a woodland glade;
use mown hay to create the walls.
The advantage of this approach is that you can create a labyrinth in just a few minutes with whatever is to hand.
However, things get a little more complex if you want to create an accurate classical labyrinth, with truly circular arcs and regular path widths…
For an indoor labyrinth I would recommend a path width of at least 1 foot (30 cm) for solitary walking or 2 feet (60 cm) for more comfortable walking, running or group activity -
These instructions are scalable to any size and work on a path width of 1 unit -
Preparation
The method suggested here requires five fixed vertical posts. Outdoors, these can be wooden stakes or tent pegs, metal pins or poles knocked into the ground. Indoors, these posts will require a heavy base and someone to hold on and stop them moving while the design is laid out.
Along with the posts, you will also need a length of string or rope (preferably nylon, something that doesn’t stretch when pulled) that has a length at least 8 times the planned width of your paths.
First tie a loop at one end of the string, just large enough to fit over your post, but not so tight that it doesn’t swing freely around the post.
Then, with the loop around one of the posts, measure along the string ½ of your path width unit -
Now continue to add a total of 7 more knots/ribbons each spaced 1 unit further along the rope -
 The Layout Process
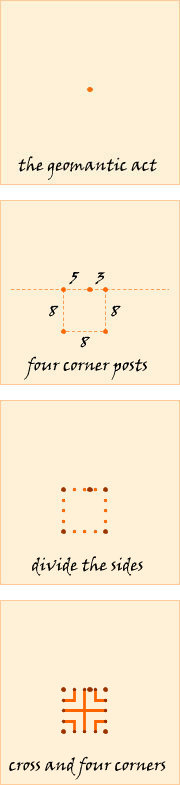
The first step is the "geomantic act" -
Crucial issues are (i) is there enough room around this central point to construct the complete labyrinth, and (ii) in which direction will the entrance to your labyrinth be situated? You should construct the square of the “seed pattern” in the subsequent steps so that the bottom edge is facing the direction that you wish the entrance of your labyrinth to face.
For outdoor labyrinths, if the dotted line runs exactly East-
The next step is to mark out the square that encloses the seed pattern with four more corner posts. The square is 4 path width units on a side, but subdivide this measurement into 8 (½ path) units, and here comes the next major decision point: do you want the first turn of your labyrinth, i.e. when you enter, to turn to the left or right?
If the first turn is to be to the left, then create the square as shown opposite, with the centre post offset 1 (½ path) unit to the right along the top edge, as shown, 5 & 3 (½ path) units -
I have made the square using Pythagoras' 3-
Now divide each side of the square into four equal parts of 1 (path width) unit each. Mark these points by poking a stick into the ground, placing a stone or making a mark. Note that your original ‘central’ post will fall between two of these points on the upper edge of the square, either to the right, or the left, depending on your decision on the first turn.
Finally, complete the labyrinth's seed pattern by marking the cross lines and corners as shown. The distances involved are small, so this is easy to do by eye -
Connecting the Points -
 This animation shows the basic approach:
Attach the loop of your string, with the first knot at ½ path width distance, to the centre post...
Keeping the cord fairly taut, wrap it around two of the posts as shown...
Note that the knots (shown red above) should pretty much line up with the cross and corner lines...
As you start to unwind the cord from the first post, mark the small arc described by the first red knot...
The second post takes over as the axis as the rope continues unwinding -
The centre post takes over as the axis as you mark out the seven semi-
The rope then wraps around the third post and finally the fourth post as you complete marking the design.
 As marking out seven lines at the same time implies you will have plenty of willing helpers, an alternative approach is to lay out one line at a time by marking the arc described by a single knot as you unwind the rope around the posts.
It is probably best (and a good way to check your accuracy) to start with the largest outer arc and work your way inwards. As you complete each line, simply move in to the next red knot and work your way back in the other direction, as shown below:
Which technique you use depends on how many people are making the labyrinth and the what method you are using to mark the paths. If you are making a permanent labyrinth then you may want to want to mark out the design first with a temporary marker, such as spray paint or sand.
I have often used a sticks-
As for materials suitable for use for constructing your labyrinth, here are some suggestions:
Lawns and fields
temporary: bird seed or chopped chicken corn is very effective, sawdust, sticks, sand, flour, lime or water-
seasonal: tennis-
permanent: stones, earth, bricks, paving, bark chips or dug-
Beaches -
Tarmac or concrete -
Indoors -
Text and graphics on this page were originally created in 2000 by Adam Warren
and have been revised and updated 2017 by Jeff Saward.
Laying out a Labyrinth
| Who we are |
| Labyrinth Layout |
| Current & Back Issues |
| Caerdroia Subscription |
| Digital Downloads |
| Caerdroia Submissions |
| Caerdroia 55 |
| Printed Edition Order |
| Digital Edition Order |
| Caerdroia Archive |
| Labyrinthos Archive |
| Trojas murar |
| First Labyrinths |
| Roman Labyrinths |
| Turf Labyrinths |
| Stone Labyrinths |
| Nordic Churches |
| Medieval Labyrinths |
| Labyrinth Graphics |
| Gothic Revival |
| Locations |